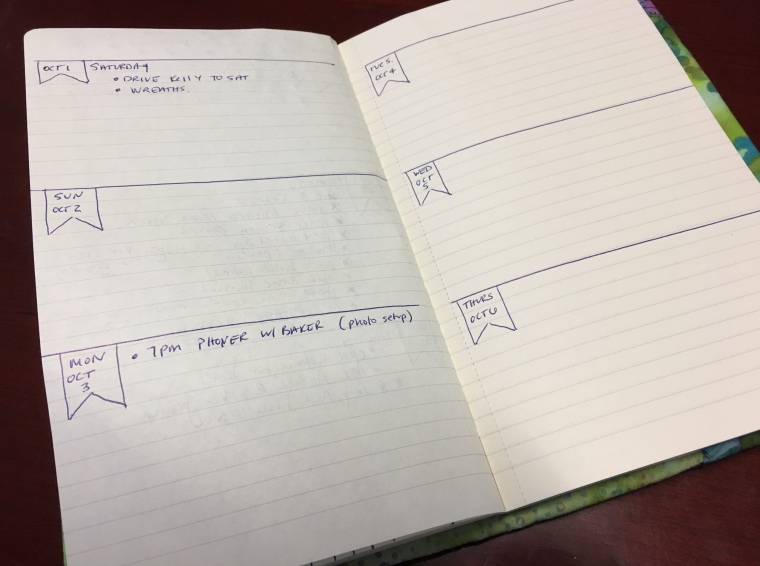
I spend a lot of time on my phone, and it’s time to break the habit. When I heard about the bullet journal, I knew that would be a good first step.
A bullet journal follows a simple pattern. It’s contained in a blank notebook of your choosing. It starts with an index, which lets you track what you are jotting down on your pages (all pages in your journal are numbered). That’s followed by a future log, a monthly overview, and your daily tasks, notes, events and reminders. You create a key to remind yourself of the symbols you are using to track your information. You can find all the details about setting up a bullet journal at bulletjournal.com.
Once I delved more into the bullet journal, I quickly realized it’s an obsession for the doodle conscious. There are blogs, Pinterest boards, Instagram accounts, and youtube videos, all dedicated all designed to inspire you to make your journal your own. they help you create one that is as pretty and organized as you want it to be. I have no interest in spending hours creating pretty headers and pages for my journal. It’s much more utilitarian. I’m just getting started and trying to figure out what works for me.
However, I didn’t like the way my bullet journal kept getting crushed in my pocketbook, and I immediately realized this was a great way for me to use my scraps on an easy sewing project. Hence, the quilted bullet journal cover I created below. I used this fantastic tutorial which was very easy to follow. I was pleased as punch when I realized I actually had scraps of the same fabric the author used for her tutorial. I sincerely hope she agrees that imitation is the best form of flattery. I think hers came out much prettier than mine, but I am happy with my results. Now, on to filling out those blank pages!
A personalized quilted cover for my bullet journal
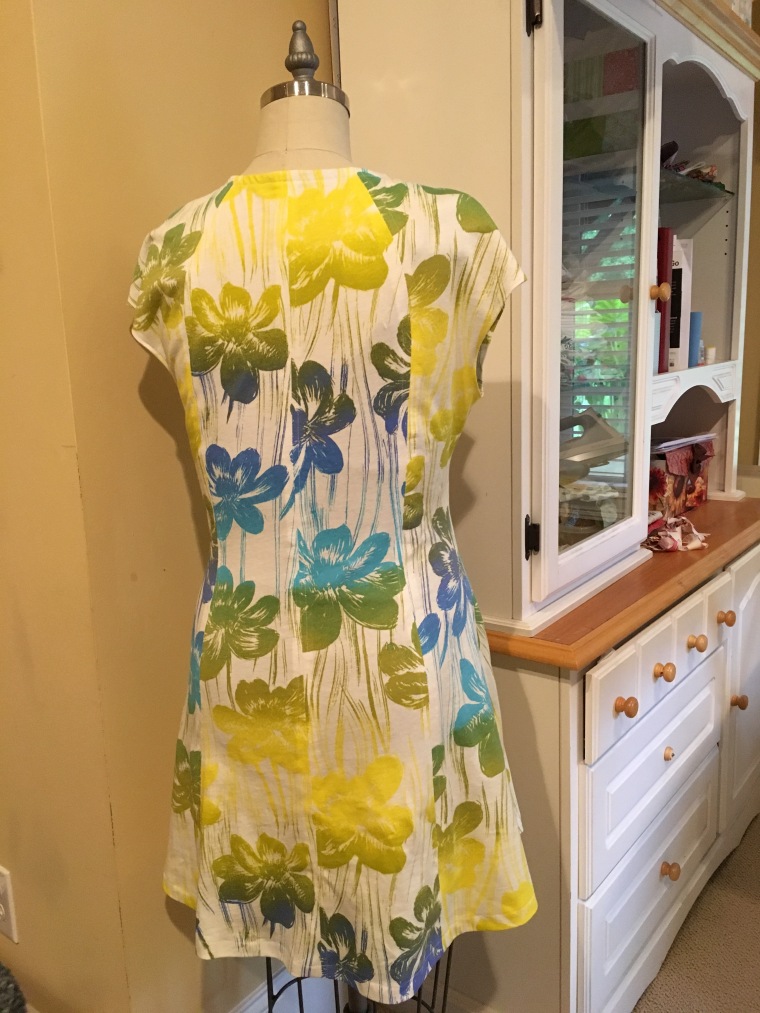
This cotton jersey was much much easier to work with than the slinky ITY I bought at Joanns. I had no problems with the fabric catching in my machine. It was smooth sailing. However, the lesson I learned from this wearable muslin is to watch my fabric pattern. I like the way the dress came out, but I don’t really like the way the pattern looks with all these seams. it was a good lesson for me to learn about choosing fabric and patterns, and watching out for how many seams a garment has and how the fabric pattern will be affected.
I also had to alter the pattern because the arm holes are absolutely huge. Not only do they hang very low; they also gape so that you can see my bra. After reading a few reviews, and knowing that lifting the shoulder seam worked on my first Davie dress, I made two adjustments: I took half an inch of each shoulder at the top, and a quarter inch under the sleeve.
I bought a busy check ponte at GirlCharlee, but I think it will be way too loud. And I think the seams will cause an issue for me to really like the dress. So I’m holding off. I think I’ll have to buy a solid ponte somewhere before I splurge on Emma One Sock. I really want to make a color block Davie dress with a dark floral on the front two panels, and black or even plum or gray on the sides. I’ll keep you posted on my progress.
Since I am not a very confident sewer, I love finding free patterns. That way I can make mistakes and not feel like I wasted my money. There are a few good free patterns out there. You can find many at this forum post on sewing.patternreview.com. The only one I can vouch for with complete confidence is the Colette Sorbetto. I’ve made it 3 times – each slightly different – and it works every time.
This is one is by far my favorite. I bought this fabric at a local fabric shop – the only independent shop that sells fabric for apparel in my area – for $13.99/yard. I’m not exactly sure what it is. It’s cotton, it has a nice drape with structure, and feels soft. I was so afraid to cut into it. But, this is why you spend more for fabric. It wears well, washes well, and looks great.
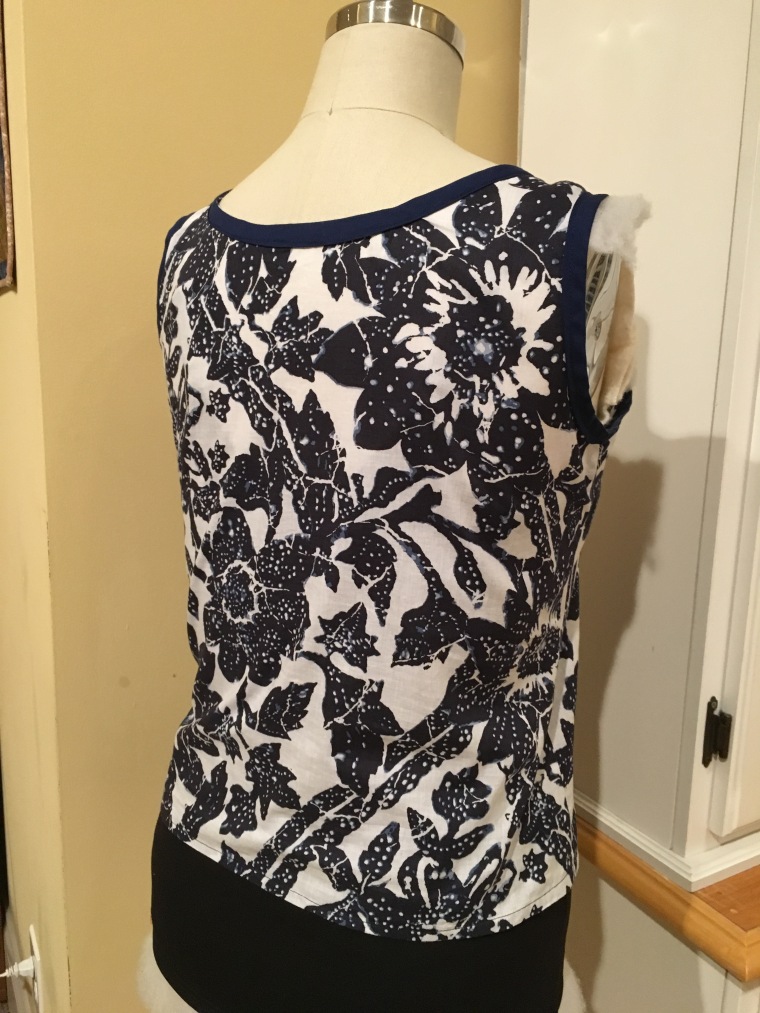
So, as usual, I went to Joann’s first and made my first Sorbetto from some cotton lawn. (Picture coming soon.) It came out well. I purchased the dark blue binding you see on this top, and used it on my first top. I had enough leftover to do this binding. I love this top. I made a straight size 8 and it fit to a T. (Just showing you the back of it here so you can see both sides.)
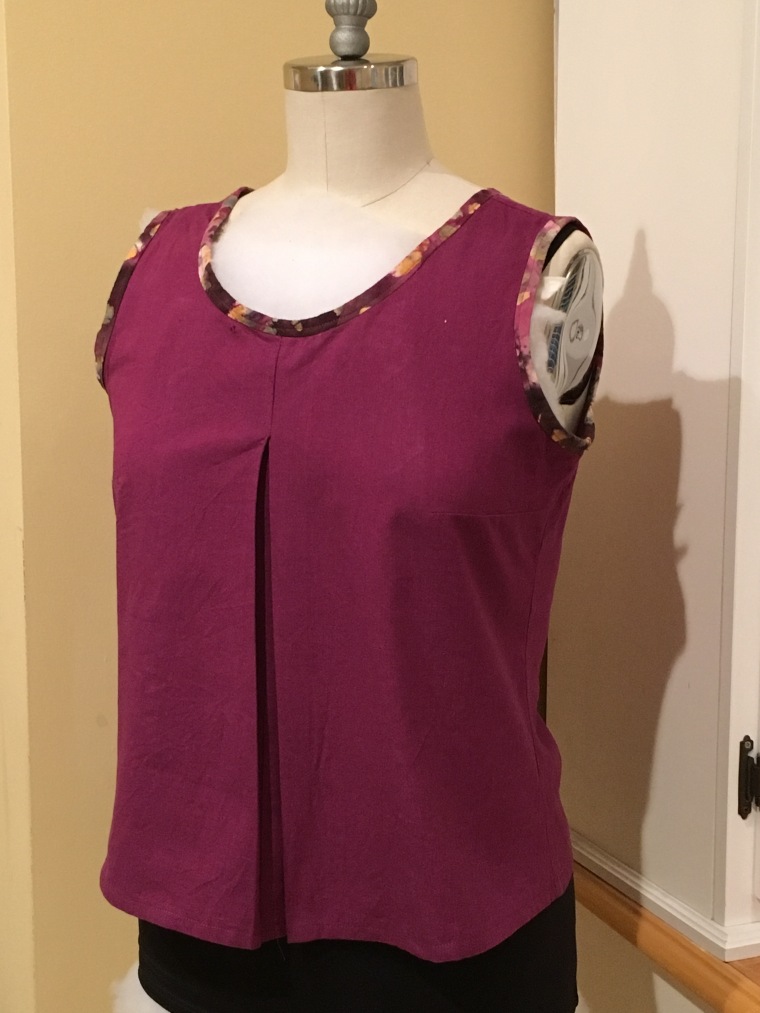
You can find a lot of variations on the Sorbetto on the Collete blog. I inverted the pleat on my most recent one, and my own bias binding using this tutorial and a fat quarter. (The first time I made my own bias binding, I used the Colette tutorial and a Clover binding tool. I didn’t like how it came out at all. The tutorial I linked to is very similar, but my binding tape came out better since I really wanted half-inch double fold, not one-quarter single fold.)
I’m not crazy about how the pleat puffs out at the bottom. (Picture coming soon.) I’m not sure what I would do to fix that so I don’t know if I’d do it again. If you have any suggestions, please feel free to share!
My next free pattern will be the Hemlock T from Grainline studios. It’s only available by signing up for their newsletter. I’ll let you know how it goes.
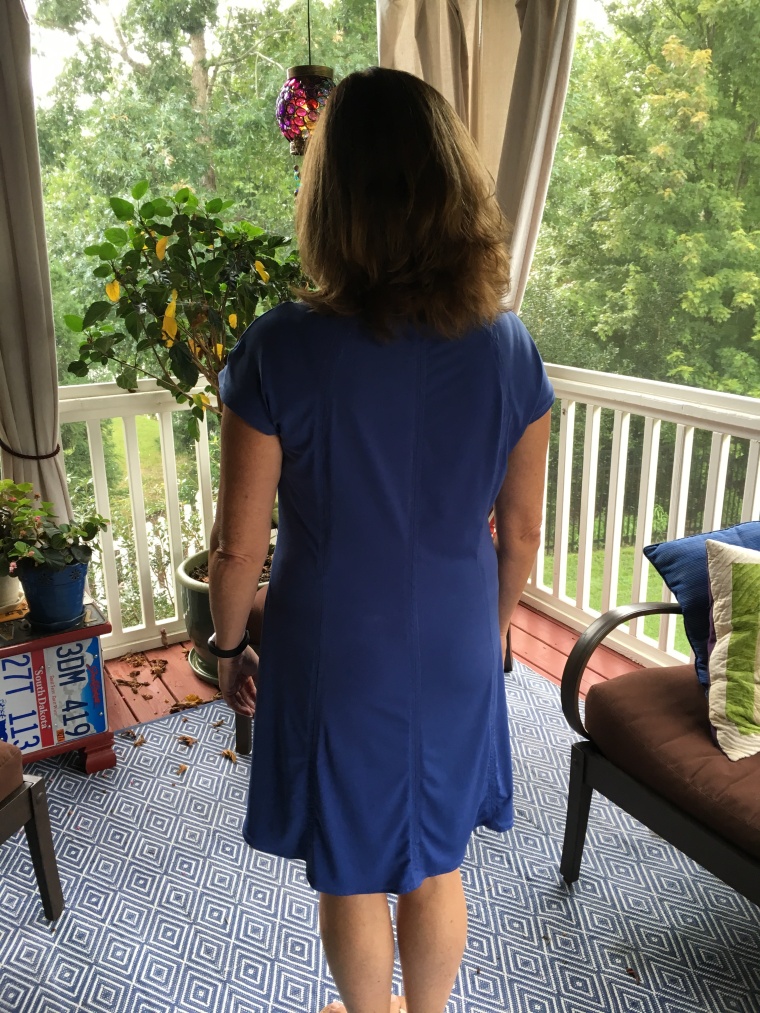
This is my first attempt at Sewaholic’s Davie dress. While I’m not sure if it’s a wearable muslin – I haven’t worn it yet – I will definitely be making it again.
The dress is easy to make – if you’re comfortable with knits. I am not. I’m still learning my way around them, and I don’t have a serger. But that isn’t necessary for this dress. All the seams are sewn with a sewing machine, then top stitched so that they lie flat. The dress is flattering, although I think it’s sized at least one or two sizes too big.
Davie dress alterations
I picked a size 10 based on the dress’ finished measurements, but took it in a lot on the sides and at the shoulders and especially under the arm. The dress pieces are sewn together, first the front, then the back, then at the shoulders, which allows you to take it in at the sides if necessary. I liked that. I just retraced the size 8. I’ll let you know how that works out.
The arm holes are quite large and low. I tried to sew clear elastic into the shoulders but must have pulled it too much because the shoulders came out lumpy. I just cut it out – probably cut at least an inch off each shoulder – and sewed them up again. You can see that it didn’t ruin the dress at all – even lifted it up a bit so that there wasn’t as much of a gap in the arm hole.
I used a woven double fold binding tape around the neckline as indicated in the instructions by following this tutorial. Rather than follow the instructions, I used the same binding method for the sleeves. I think it made them stand up a little nicer, rather than be floppy.
Davie dress fabric choices
I bought this purple ITY knit at Joanns. It was relatively inexpensive, and I could tell it was very stretchy, but I thought it would be easier to work with. It was not easy to work with. I used a ball point needle, a stretch stitch and a walking foot, and put gift wrapping tissue under the fabric, but it caught in the machine a lot. I wish I knew why that happens. It was very frustrating and made for a lot of pulls. I don’t like how it looks in the back, which is one reason I may not be wearing this muslin. I think I should have lengthened my stitch. I did lengthen the top stitching stich. I also don’t think I’ll be top stitching in the zig zag stitch. And from now on, I’m using my teflon foot for this type of fabric. It just works better for me than the walking foot.
I just don’t like all the different spots I can see on this solid where the thread jammed or the fabric got sucked into the machine. That’s especially true around the curve on the breast. A pattern review that I read said to carefully snip the seam allowance around the the curve so the fabric would lay smoother. I think that screwed up my top stitching. It bunched too much for me to feel comfortable wearing it.
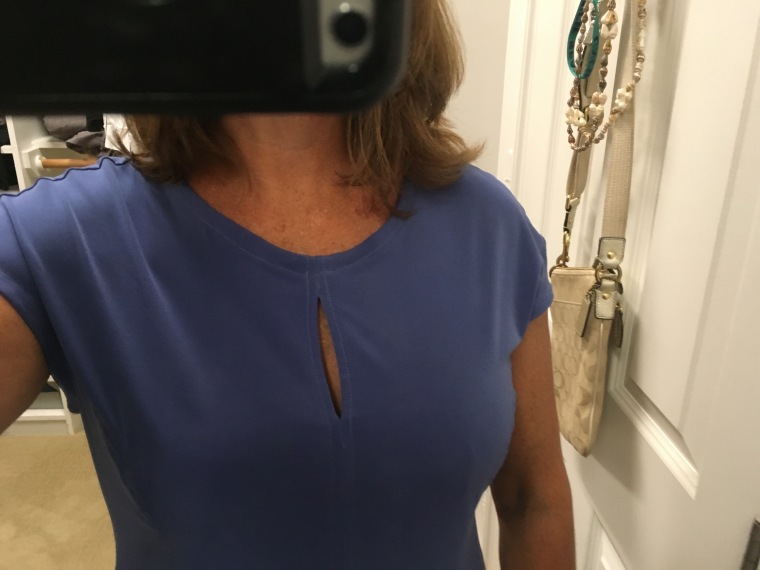
I love the way the keyhole came out and I love the overall look of the top stitching. But be forewarned: all that top stitching takes a lot of time and uses A LOT of thread. I bought a small spool of matching Guttermans thread for this dress and had to go back and get another spool. If you’re going to make this dress, make sure you have a lot of thread!
All in all, I really like the way this dress looks on me, but I feel it could look better. I’m trying it again with this fabric, and just ordered this ponte from girlcharlee.com that was on sale. If I can get good at making this dress, I’m going for the gusto and ordering a ponte from Emily One Sock. I’ll keep you posted on my results!
I have always been an avid reader, but whenever I read on my iPad, I tend to think to away from the book. Then I can never get into it, the library wants it back, and poof, it’s gone. Or, even better, I buy the book on my iPad on impulse because it sounds good, and it’s not.
That’s why I am no longer buying e-books and only reading hardcover. For the most part, it works. I love feeling the heaviness of the book in my hands, I love turning the pages, being able to see what page I’m on (something I can’t always see on my iPad), and knowing I can look back a few pages if I forgot something.
I went to the library a few weeks ago, and The Homecoming of Samuel Lake by Jenny Wingfield was sitting on the bookshelf, just waiting for me. A Goodreads friend had told me she liked it so I gave it a shot. It was the type of book that can give you a stomach ache and keep you up at night because you want to keep reading to make sure the characters are okay. That’s my kinda book.
I am not a religious person, and this is a book for people who want to believe in miracles. It’s set in the South, I think, around the 1950s, but there’s nothing strong in the setting to make that a significant part of the plot. It’s not about civil rights, or segregation as one might think in that era. Rather it’s about good vs. evil.
I don’t want to give the plot away, but I will tell you that Samuel Lake is a preacher who brings his wife and family back to live with her somewhat eccentric family (even that’s not a good description) after he is denied a new preaching post. The dynamics between the family and a nearby neighbor drive the story. The plot centers around his adolescent daughter, Swan, in a way that reminds me of To Kill a Mockingbird (a book I readily admit I did not really enjoy. I know. That’s a terrible thing to say, but it’s true.)
This book captured my heart from the minute I started it and kept me enraptured in the story until the very end. Bad things happen to good people. But that’s all I’m going to tell you. Read it for yourself and let me know what you think in the comments below.
My family loves pizza night, but I don’t mean buying it from the neighborhood pizza place. Making your own pizza dough is simple, fast, and fun. Let me tell you how I do it.
Cheese pizza and buffalo chicken pizza
Making the pizza dough
Pizza dough is so simple – it’s just flour, water, yeast and salt. Some recipes call for oil and sugar. But that’s it. Mix it up ahead of time, let it rest, and soon you’ll be making pizza.
I started making pizza with a bread maker. When it broke, I resorted to buying pizza dough in the store when it was on sale for $1 per one-pound ball. I’d buy several and freeze them, then pull one or two out and leave them in the fridge to thaw. One, one-pound ball feeds about four adults. Eight slices, two per person.
Looks like I added some leftover sauteed peppers and onions. I always drizzle with Sriracha.
Then I discovered this free Craftsy perfect pizza at home class. It’s a great introduction to making a variety of pizzas. Again, simple recipe, make the dough ahead of time, cut the recipe in half, store, and you have two pizzas ready to bake by later that day or, (better yet), the next day. (The dough needs to rise for several hours. Don’t rush it.)
Things got even easier when I signed up for Artisan Bread in Minutes on Craftsy. I still can’t get over how simple it is to make bread. Put your ingredients in a bowl, mix by hand, let sit, refrigerate, make pizza. That’s it. And it comes out fabulous. I made this Sicilian pizza last night. I made it on a cookie sheet. It’s covered with a simple marinara sauce from a jar, shredded mozzarella and Asiago, and pepperoni. It was delicious.
Sicilian pizza with tomato sauce, mozzarella and pepperoni
Toppings
That brings me to toppings. We are not typically plain pizza people. I like variety, and a pizza can really hold anything. I’v even put Thanksgiving leftovers on pizza (sans the stuffing).
Our favorite starts with a layer of mayonnaise, which is topped with broccoli, tomato, bacon and cheddar cheese.
Broccoli, bacon and tomato pizza with cheddar cheese
We also love starting with a layer of Italian dressing, topped with sautéed spinach, carmelized onion, and bacon. Hawaiian pizza starts with tomato sauce, followed by chopped deli ham, mozzarella and pineapple. Then there’s buffalo chicken pizza – which is a layer of ranch or blue cheese dressing, mozzarella cheese, then loaded with leftover chicken smothered in Texas Pete mixed with melted butter.
Cheese pizza and buffalo chicken pizza
Barbeque pizza is a hit too. We’ll start with a layer of your favorite barbeque sauce, then top it with mozzarella cheese, leftover chicken dressed with more barbeque sauce, peppers and onions (cooked or uncooked – it’s up to you.)
As you can see, the possibilities are endless.
Pizza stone
I would be remiss if I didn’t talk a little bit about cooking your pizza. First, your oven/grill needs to be piping hot. I cook my pizza at around 450 degrees. Whether on the grill or in the oven, it is crucial that your pizza stone also be preheated and hot.
The one exception to this rule is my Sicilian pizza. While my oven was heated up for at least 15 minutes, I did not pre heat the cookie sheet. My pizza came out good, however, in my opinion, the top was a little overcooked. The dough was perfect. (I cooked this pizza at 475 for 15 minutes. Next time I’ll do 450.)
I use an Emile Henri pizza stone. You can buy a cheaper one, but they are typically very heavy. This stone retains a lot of heat and is easy to move out of the oven when the pizza is done because it’s thin. You can see it here resting on my stove top.
Spinach, carmelized onion and bacon pizza
A pizza peel is also a must. And parchment paper. For a long time, I was flouring my pizza peel, rolling out my rested dough, then shuffling it into the oven or on the grill. If the pizza became heavy from the toppings, it would stick just a little, causing the toppings to tumble into the oven (or the grill), and remain there as burning reminders for the next few days. Now I flour a piece of parchment paper, put that on the peel, easily transfer the pizza to the oven (no dropped toppings), and take it off the parchment paper when it comes out.
Let it rest
In making all these pizzas, the most important tip I can give you is to NOT use your dough straight from the cold refrigerator. Take the dough out and let it rest on the counter for at least 20 minutes. That will let the gluten relax, and allow your dough to be stretched into your pie shape much easier. We’ve tried fighting with the dough, but it would just bounce back and not hold its shape. If you have that problem, walk away. Have a glass of wine. The dough will rest and become more pliable and you’ll have a more enjoyable experience.
Two pizzas ready for eating
So, armed with all these simple and amazing pizza options, what’s on your menu tonight?
If you’ve never tried paper piecing, I urge you to give it a go. It’s a lot of fun. I wanted a challenge so I bought this leaf pattern from Quiltworx. It was expensive. When I opened it and saw the instruction booklet, I let it sit for a few months. It was so intimidating. When I finally urged myself to create it, I was thrilled with the result.
The pattern calls for enough fabric and paper to make the two leaves. I made both at once, knowing I wouldn’t want to go back and do all that cutting again. Take your time, read all the instructions first, and follow them thoroughly. You’ll learn to sew curves, and glue baste. I had never done either before and I was so pleased how these leaves turned out.
I had a few questions during the binding portion. I emailed Judy Niemeyer, who owns Quiltworx and created all the gorgeous, intricate patterns. She responded immediately and helped me stay on track.
I stitched in the ditch around the veins so it wouldn’t take away from the beauty of the finished product.
We try to eat fish at least once a week and salmon is usually on the menu. I buy it frozen in individually wrapped packages at Costco, and just pull out the servings I need. This recipe is a keeper. It’s probably good as is, but I put my own twist on it. Biggest change: adding more vegetables and baking in the oven, rather than on the stove.
First I carmelized red onion. I sprinkled salt, pepper, brown sugar and a dash of balsamic. I had some baby spinach so I threw that in there too. About half a bag. It cooks down to nothing.
Then I made the glaze for the salmon. I didn’t marinade it as the recipe suggests. I just placed the cooked vegetables in the bottom of my casserole dish and poured the glaze over the salmon. I felt the need for a splash of balsamic vinegar. It was just calling my name. This is how it looked before I popped it in the oven.
This is how it looks after about 10-15 minutes in the oven at 450 degrees. I use a thermopen to make sure the fish reaches about 145 degrees. I’m happy with it a little under. Better less cooked than over, in my opinion.
(I highly recommend this thermometer. Yes, it’s expensive, but well worth the investment. I use it on everything.)
One quick looked at the finished dish on the plate before I tore into it. It was absolutely delicious.
If you have any left over, simply flake the salmon with a fork and chop the onions and spinach. Add some sriracha and mayonnaise – not too much. — Pile it on some artisan whole wheat bread topped with arugula and you have the perfect salmon salad for lunch the next day.
I’d seen corded fabric bowls on a Facebook sewing page and thought, how hard could they be? They looked fabulous. I had to give it a try.
I found this tutorial on You Tube and it is really good. I would suggest you follow it. I made a left turn. I should have stayed the course.
The object of the game is to buy clothesline (I got mine at Walmart) and wrap half-inch or so WOF scraps around it. You use a regular foot and a zigzag stitch to hold the clothesline together and create the bowl.
I wanted to use up the scraps that were leftover from this table runner that I made from a jelly roll. I cut the strips in half, but I probably should have halved them again. They were a bit too fat.
Make sure you have a good base for your bowl.
The first time I made one, I started shaping the bowl too soon and ended up with a narrow base and a wobbly bowl. In addition, when you start to craft the bowl, be sure that you are turning it up to the left of your machine so it doesn’t start to grow under the throat. I made that mistake the first time too.
Also, be prepared for the bowl to have a very scrappy, threaded look, unless you cut your fabric on the bias. It will start to shred and untangle as you wrap it around the clothesline.
So, what do you think? Do you like my corded fabric bowl? Will you make one yourself? Let me know in the comments.
When I asked my sister for fabric for Christmas, I really didn’t know to expect. I wanted to try some different patterns and create some easy projects. She gave me two jelly rolls. After opening this one, and seeing how perfect it matched my kitchen, I scoured the internet for a table runner. I decided on a a variation of a french braid.
Most french braids have pointed ends, and have a diamond in the middle. Here’s a tutorial from Jenny Doan at the Missouri Quilt Company if you want to follow that idea. I wanted a rectangle. And, because I only had jelly rolls, it would be difficult for me to make the large diamond in the middle. I made my own version.
I started sewing pieces together, using the light 2 inch square in the center. If I had followed the tutorial, I probably would have been more efficient with my fabric. As you can see, I ended up with longer and longer pieces. I started using shorter pieces to preserve fabric, but then I was concerned the table runner wouldn’t be wide enough.
Once I measured my table, and a table runner I already had, I settled on my width and length and squared it up. I used the leftovers to make a simple backing, and pieced together enough light pieces to make the binding, which I machine sewed.
On to the quilting. I had taken Crafty’s Creative Quilting with Your Walking Foot (This class is my all time favorite so far – Jacquie Gering is an excellent teacher.) One of the more fancy stitches she recommends is the serpentine stitch. At first I thought I would do it both ways, crossing at the middle. But after finishing this table runner, I had enough. Straight line quilting is a bit tedious. And, even though she makes it look easy, believe me, it is not.
While I can see all the mistakes -the stitches are uneven, and a bit wobbly, – I think the overall look of the table runner is very consistent. And I love the contrast between the thread and the fabric.
This table runner is proudly displayed on my kitchen table. How do you like it?
Next I’ll share what I did with the leftover scraps.


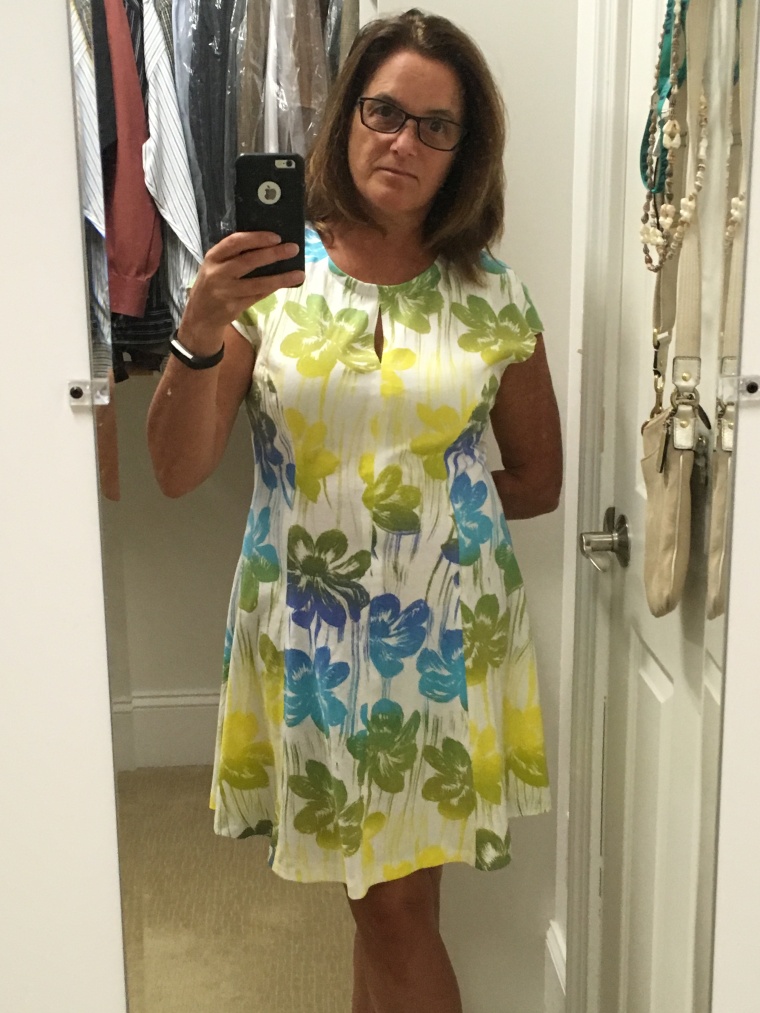 This cotton jersey was much much easier to work with than the slinky ITY I bought at Joanns. I had no problems with the fabric catching in my machine. It was smooth sailing. However, the lesson I learned from this wearable muslin is to watch my fabric pattern. I like the way the dress came out, but I don’t really like the way the pattern looks with all these seams. it was a good lesson for me to learn about choosing fabric and patterns, and watching out for how many seams a garment has and how the fabric pattern will be affected.
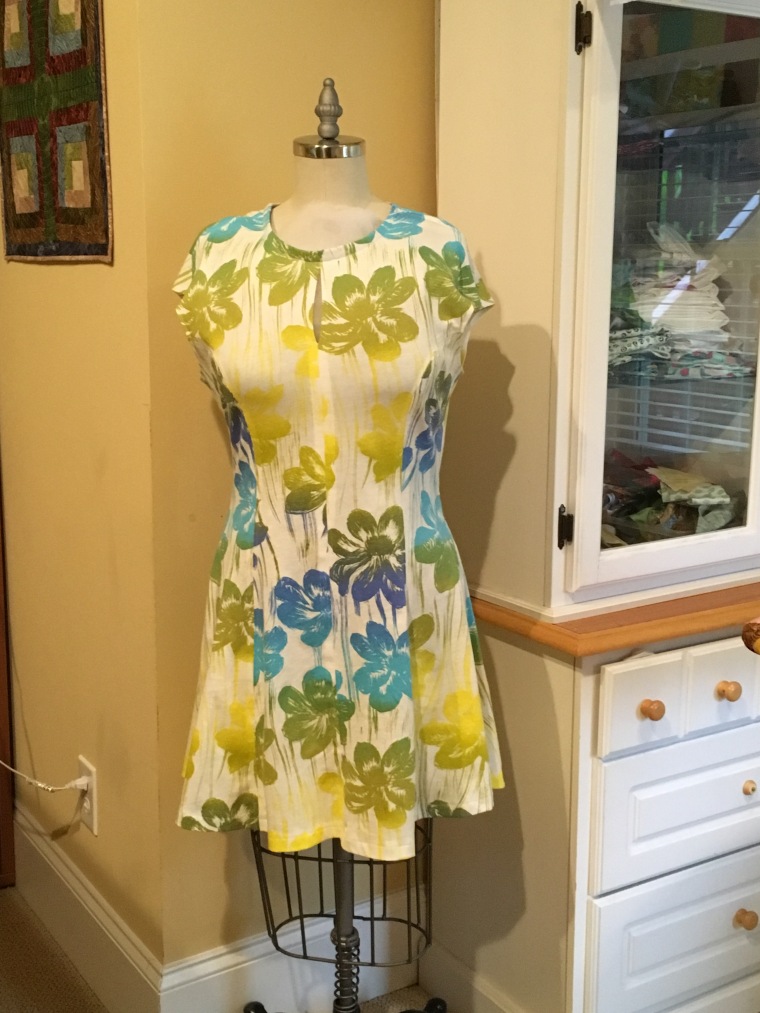
 I bought a busy check ponte
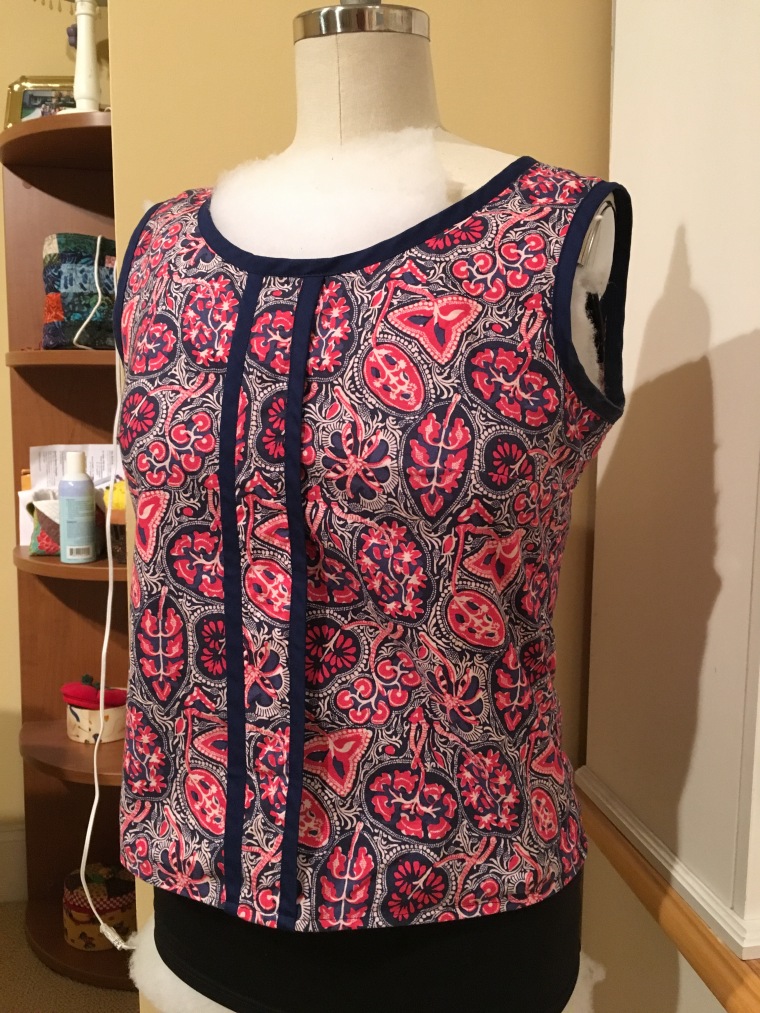


 end had told me she liked it so I gave it a shot. It was the type of book that can give you a stomach ache and keep you up at night because you want to keep reading to make sure the characters are okay. That’s my kinda book.